RTC1307 - Real Time Clock
Welcome to Combustory
Any questions or comments:
- Send them to - combustor@combustory.com
|
Summary
This code shows how to communicate with the RTC DS1307 Real Time Clock, which is used to set and retrieve the date/time of the chip. As a bonus there are some additional bytes of data that can be used as general purpose memory. The main reason for my use of this code is to be able to log events that occur in my applications. I recommend for you to get the RTC DS1307 data sheet to help with understanding what was done here. The bottom line is that I have created this program to accept commands via serial communication with a PC to instruct the Arduino to send or receive data via I2C to the storage registers of the RTC DS1307 chip.
Note of gratitude to Maurice Ribble - http://www.glacialwanderer.com/hobbyrobotics/?p=12 for the majority of the RTC DS1307 code. To not repeat his excellent instructions on this chip I highly recommend you visit his site on this topic. All I did here was expand his code a to get a little more functionality out of the DS1307 chip.
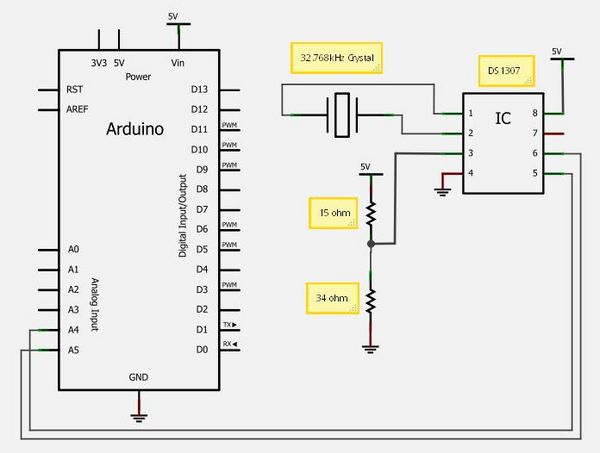
Schematics
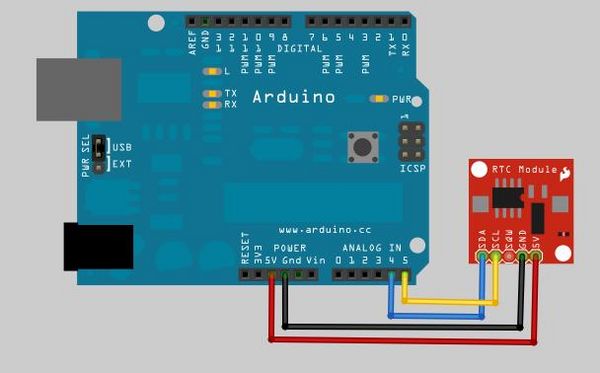
RTC Module
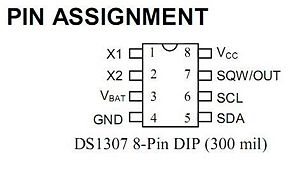
DS1307 Chip
Method
If you want to take the easy route, spend the extra bucks and buy a Spark Fun ready to go unit for around $15. However, if you really prefer spending an extra hour or so (In my case 4 hours, but you get the benefit of my labor ;~), then buy a few chips from Digikey or Mouser. I think I spent a couple bucks to pay for the chip and the crystal, I ended up having to use two resistors as well, but those were from my existing inventory. If you go the chip route, just keep in mind that shipping can be significant, so you will want to buy more than just the chip.
The reason I had to use the resistors, was to create a voltage divider to create a voltage on the battery backup pin. As I found out and fortunately you will not endure because you are reading this right now, is that the battery pin must have 2.5-3vdc to operate properly or the chip will stop responding to IC2 requests. Ok, we all know the rule, "When all else fails, READ THE DIRECTIONS". As wisdom will have it, I eventually read this seemingly insignificant information in the Data Sheet. Well if I get the time I will outline all the details on the parts and schematic, but the bottom line is that I was still to cheap to buy a 3v battery, so I just used the voltage divider to drop the 5vdc supply. The absolute most funny part is that the chip does run just fine without the 3vdc...... sometimes. Meaning you think you have it all worked out and then......... sometimes. Hence four hours. But your not going to make that mistake are you? Because you are here. Soooooooo, after all is said and done the chip is very stable and works as expected and is reliable.
Concerning the semi-non-volatile memory on this chip, I have included the ability to initialize and read the memory. Originally I was unable to read/write all the registers, but someone had resolved this issue by understanding the limitation of this chip or I2C, I am not entirely sure. However, the solution was to limit the number of register writes to 32 registers per I2C session. The code now includes this fix and all registers can be written by creating two I2C sessions.
This page does not cover the clock output pin that has several settings for outputting a clock frequency, so I will leave it to the reader to figure that function out, as I have no need for that right now. Another interesting feature on this chip is that the time and memory is maintained as long as you have that battery backup at 2.5-3v. But if the chip goes into backup mode, you will not be able to read or write to any of the registers. One misleading piece of data in the Data Sheet is that the memory is non-volatile, well that is true as long as you have the battery backup power. In my voltage divider method, when the power is gone it is gone-gone, so basically no data is retained, but that is exactly why I made the date/time setting command, because I just reset it from the host software that I use to control the Arduino. Go to Arduino Communications to see how I am communicating with the Arduino.
I2C
Arduino 1.0
The current code examples have been updated to Arduino 1.0. The only difference in these examples is from the wire.h Library. The methods have changed as follows:
- Wire.send is now Wire.write
- Wire.receive is now Wire.read
The RTC_DS1307_Control code below uses pre-compiler directives to solve version incompatibility issues.
Examples
There are basically only two operations that control this chip, a read or write to 64 data registers and the process is similar for both read or write.
Reading Data
- Reading date/time
- Open the I2C communication in write mode.
- Set the register pointer to (0x00) - To read the date/time you reset the pointer to the first register.
- End write mode.
- Open I2C in read mode and read seven bytes of data.
- Reading date/time
Wire.beginTransmission(DS1307_I2C_ADDRESS);   // Open I2C line in write mode
  Wire.write((byte)0x00);                              // Set the register pointer to (0x00)
  Wire.endTransmission();                       // End Write Transmission

  Wire.requestFrom(DS1307_I2C_ADDRESS, 7);      // Open the I2C line in send mode

  second     = bcdToDec(Wire.read() & 0x7f); // Read seven bytes of data
  minute     = bcdToDec(Wire.read());
  hour       = bcdToDec(Wire.read() & 0x3f);
  dayOfWeek  = bcdToDec(Wire.read());
  dayOfMonth = bcdToDec(Wire.read());
  month      = bcdToDec(Wire.read());
  year       = bcdToDec(Wire.read());
- Reading Memory - The process is essentially the same as Reading date/time with two small differences
- (1) You have to set the register pointer where you want to read the memory.
- (2) You have to indicate how many bytes to read.
- Reading Memory - The process is essentially the same as Reading date/time with two small differences
Wire.beginTransmission(DS1307_I2C_ADDRESS);
  Wire.send(0x08);                             // Set the register pointer to (0x08) to read first memory byte
  Wire.endTransmission();

  Wire.requestFrom(DS1307_I2C_ADDRESS, 1);     // In this case only read one byte

  temp_byte     = Wire.read();              // Read the desired byte
Writing Data
- Write date/time.
- Open the I2C communication in write mode.
- Set the register pointer to (0x00) - To write the date/time you reset the pointer to the first register.
- Write seven bytes of data.
- End write mode.
Wire.beginTransmission(DS1307_I2C_ADDRESS);  // Open I2C line in write mode

   Wire.write((byte)0x00);                           // Set the register pointer to (0x00)
   Wire.write(decToBcd(second));               // Write seven bytes
   Wire.write(decToBcd(minute));
   Wire.write(decToBcd(hour));
   Wire.write(decToBcd(dayOfWeek));
   Wire.write(decToBcd(dayOfMonth));
   Wire.write(decToBcd(month));
   Wire.write(decToBcd(year));
   Wire.endTransmission();                    // End write mode
- Writing Memory - The process is essentially the same as writing date/time with two small differences
- (1) You have to set the register pointer where you want to write the memory.
- (2) Now write the byte value you want in that memory location.
- Writing Memory - The process is essentially the same as writing date/time with two small differences
Note: You can continue writing and the register pointer will go to the next memory location. When the pointer reaches the end of the memory it will start back at the beginning, which will overwrite your date/time if you are not careful.
Wire.beginTransmission(DS1307_I2C_ADDRESS);
  Wire.write(0xf3);                             // Set the register pointer to (0xf3) to write the 11th memory byte
  Wire.write(0xa6);                             // Write the desired byte value
  Wire.endTransmission();
RTC_DS1307_Control v1.00 code
/* RTC Control v1.00
 * by <http://www.combustory.com> John Vaughters
 *
 * THIS CODE IS FREE FOR ANYTHING  - There is no Rocket Science here. No need to create some long GPL statement.
 *
 * Credit to:
 * Maurice Ribble - http://www.glacialwanderer.com/hobbyrobotics for RTC DS1307 code
 * BB Riley - Underhill Center, VT  <brianbr@wulfden.org> For simplification of the Day of Week and month
 *                                                        and updating to Arduino 1.0
 * peep rada - from Arduino Forum - Found that only 32 registers per I2C connection was possible
 *
 * With this code you can set the date/time, retreive the date/time and use the extra memory of an RTC DS1307 chip.
 * The program also sets all the extra memory space to 0xff.
 * Serial Communication method with the Arduino that utilizes a leading CHAR for each command described below.
 *
 * Commands:
 * T(00-59)(00-59)(00-23)(1-7)(01-31)(01-12)(00-99) - T(sec)(min)(hour)(dayOfWeek)(dayOfMonth)(month)(year) -
 * T - Sets the date of the RTC DS1307 Chip.
 * Example to set the time for 25-Jan-2012 @ 19:57:11 for the 4 day of the week, use this command - T1157194250112
 * Q(1-2) - (Q1) Memory initialization  (Q2) RTC - Memory Dump
 * R - Read/display the time, day and date
 *
 * ---------------------------------------------------------
 * Notes:
 * Version 1.0
 *    Moving this code to Version 1.0 because this code has been updated to Arduino v1.0 and the features have
 *    been well tested and improved in a collaborative effort.
 *    - Fixed the issue of not being able to access all the registers - JWV
 *    - Added initialization for all non-time registers - JWV
 *    - Added Dump of all 64 registers - JWV
 *    - Some Date/Time reformatting and cleanup of display, added Day/Month texts - BBR
 *    - Made compatible with Arduino 1.0 - BBR
 *    - Added Rr command for reading date/time - BBR
 *    - Made commands case insensitive - BBR
 *    - Create #define varibles to support pre Arduino v1.0 - JWV
 * Version 0.01
 *    Inital code with basics of setting time and the first 37 registers and dumping the first 32 registers.
 *    The code was based on Maurice Ribble's original code.
 *
 */

#include "Wire.h"
#define DS1307_I2C_ADDRESS 0x68  // This is the I2C address
// Arduino version compatibility Pre-Compiler Directives
#if defined(ARDUINO) && ARDUINO >= 100   // Arduino v1.0 and newer
  #define I2C_WRITE Wire.write
  #define I2C_READ Wire.read
#else                                   // Arduino Prior to v1.0
  #define I2C_WRITE Wire.send
  #define I2C_READ Wire.receive
#endif
// Global Variables
int command = 0;       // This is the command char, in ascii form, sent from the serial port
int i;
long previousMillis = 0;        // will store last time Temp was updated
byte second, minute, hour, dayOfWeek, dayOfMonth, month, year;
byte test;
byte zero;
char  *Day[] = {"","Sun","Mon","Tue","Wed","Thu","Fri","Sat"};
char  *Mon[] = {"","Jan","Feb","Mar","Apr","May","Jun","Jul","Aug","Sep","Oct","Nov","Dec"};

// Convert normal decimal numbers to binary coded decimal
byte decToBcd(byte val)
{
  return ( (val/10*16) + (val%10) );
}

// Convert binary coded decimal to normal decimal numbers
byte bcdToDec(byte val)
{
  return ( (val/16*10) + (val%16) );
}

// 1) Sets the date and time on the ds1307
// 2) Starts the clock
// 3) Sets hour mode to 24 hour clock
// Assumes you're passing in valid numbers, Probably need to put in checks for valid numbers.

void setDateDs1307()
{

   second = (byte) ((Serial.read() - 48) * 10 + (Serial.read() - 48)); // Use of (byte) type casting and ascii math to achieve result.
   minute = (byte) ((Serial.read() - 48) *10 +  (Serial.read() - 48));
   hour  = (byte) ((Serial.read() - 48) *10 +  (Serial.read() - 48));
   dayOfWeek = (byte) (Serial.read() - 48);
   dayOfMonth = (byte) ((Serial.read() - 48) *10 +  (Serial.read() - 48));
   month = (byte) ((Serial.read() - 48) *10 +  (Serial.read() - 48));
   year= (byte) ((Serial.read() - 48) *10 +  (Serial.read() - 48));
   Wire.beginTransmission(DS1307_I2C_ADDRESS);
   I2C_WRITE(zero);
   I2C_WRITE(decToBcd(second) & 0x7f);    // 0 to bit 7 starts the clock
   I2C_WRITE(decToBcd(minute));
   I2C_WRITE(decToBcd(hour));      // If you want 12 hour am/pm you need to set
                                   // bit 6 (also need to change readDateDs1307)
   I2C_WRITE(decToBcd(dayOfWeek));
   I2C_WRITE(decToBcd(dayOfMonth));
   I2C_WRITE(decToBcd(month));
   I2C_WRITE(decToBcd(year));
   Wire.endTransmission();
}

// Gets the date and time from the ds1307 and prints result
void getDateDs1307()
{
  // Reset the register pointer
  Wire.beginTransmission(DS1307_I2C_ADDRESS);
  I2C_WRITE(zero);
  Wire.endTransmission();

  Wire.requestFrom(DS1307_I2C_ADDRESS, 7);

  // A few of these need masks because certain bits are control bits
  second     = bcdToDec(I2C_READ() & 0x7f);
  minute     = bcdToDec(I2C_READ());
  hour       = bcdToDec(I2C_READ() & 0x3f);  // Need to change this if 12 hour am/pm
  dayOfWeek  = bcdToDec(I2C_READ());
  dayOfMonth = bcdToDec(I2C_READ());
  month      = bcdToDec(I2C_READ());
  year       = bcdToDec(I2C_READ());

  if (hour < 10)
    Serial.print("0");
  Serial.print(hour, DEC);
  Serial.print(":");
  if (minute < 10)
    Serial.print("0");
  Serial.print(minute, DEC);
  Serial.print(":");
  if (second < 10)
    Serial.print("0");
  Serial.print(second, DEC);
  Serial.print("  ");
  Serial.print(Day[dayOfWeek]);
  Serial.print(", ");
  Serial.print(dayOfMonth, DEC);
  Serial.print(" ");
  Serial.print(Mon[month]);
  Serial.print(" 20");
  if (year < 10)
    Serial.print("0");
  Serial.println(year, DEC);

}


void setup() {
  Wire.begin();
  Serial.begin(57600);
  zero=0x00;
}

void loop() {
     if (Serial.available()) {      // Look for char in serial que and process if found
      command = Serial.read();
      if (command == 84 || command == 116) {      //If command = "Tt" Set Date
       setDateDs1307();
       getDateDs1307();
       Serial.println(" ");
      }
      else if (command == 82 || command == 114) {      //If command = "Rr" Read Date ... BBR
       getDateDs1307();
       Serial.println(" ");
      }
      else if (command == 81 || command == 113) {      //If command = "Qq" RTC1307 Memory Functions
        delay(100);
        if (Serial.available()) {
         command = Serial.read();
         if (command == 49) {        //If command = "1" RTC1307 Initialize Memory - All Data will be set to
                                       // 255 (0xff).  Therefore 255 or 0 will be an invalid value.
           Wire.beginTransmission(DS1307_I2C_ADDRESS);   // 255 will be the init value and 0 will be considered
                                                          // an error that occurs when the RTC is in Battery mode.
           I2C_WRITE(0x08); // Set the register pointer to be just past the date/time registers.
           for (i = 1; i <= 24; i++) {
               I2C_WRITE(0Xff);
              delay(10);
           }
           Wire.endTransmission();
           Wire.beginTransmission(DS1307_I2C_ADDRESS);
           I2C_WRITE(0x21); // Set the register pointer to 33 for second half of registers. Only 32 writes per connection allowed.
           for (i = 1; i <= 33; i++) {
               I2C_WRITE(0Xff);
              delay(10);
           }
           Wire.endTransmission();
           getDateDs1307();
           Serial.println(": RTC1307 Initialized Memory");
         }
         else if (command == 50) {      //If command = "2" RTC1307 Memory Dump
          getDateDs1307();
          Serial.println(": RTC 1307 Dump Begin");
          Wire.beginTransmission(DS1307_I2C_ADDRESS);
          I2C_WRITE(zero);
          Wire.endTransmission();
          Wire.requestFrom(DS1307_I2C_ADDRESS, 32);
          for (i = 0; i <= 31; i++) {  //Register 0-31 - only 32 registers allowed per I2C connection
             test = I2C_READ();
             Serial.print(i);
             Serial.print(": ");
             Serial.print(test, DEC);
             Serial.print(" : ");
             Serial.println(test, HEX);
          }
          Wire.beginTransmission(DS1307_I2C_ADDRESS);
          I2C_WRITE(0x20);
          Wire.endTransmission();
          Wire.requestFrom(DS1307_I2C_ADDRESS, 32);
          for (i = 32; i <= 63; i++) {         //Register 32-63 - only 32 registers allowed per I2C connection
             test = I2C_READ();
             Serial.print(i);
             Serial.print(": ");
             Serial.print(test, DEC);
             Serial.print(" : ");
             Serial.println(test, HEX);
          }
          Serial.println(" RTC1307 Dump end");
         }
        }
       }
      Serial.print("Command: ");
      Serial.println(command);     // Echo command CHAR in ascii that was sent
      }
      command = 0;                 // reset command
      delay(100);
    }
//*****************************************************The End***********************
RTC_DS1307_v.01 User Guide
Not much to say here, I tend to use the Arduino in the Arduino Communications Method, so maybe someday I will present the other part of the controlling SW I made for this tool, but I will have to make changes to get it to work correctly for this particular set-up.
For now just enter the commands from the Arduino Environment or your favorite serial communications method.
Commands
Note: Commands are NOT case sensitive. T or t will work.
- T(00-59)(00-59)(00-23)(1-7)(01-31)(01-12)(00-99) - T(sec)(min)(hour)(dayOfWeek)(dayOfMonth)(month)(year) - T Sets the date of the RTC DS1307 Chip.
- Example to set the time for 25-Jan-2012 @ 19:57:11 for the 4 day of the week, use this command - T1157194250112
- Q1 - This command will initialize all the non date/time memory to 255 (0xff)
- I do this because when the RTC DS1307 goes into back up mode it returns 0 for any register, so for memory usage a 0 will be considered a failure to read memory and 255 will be a default value. Meaning it is considered null.
- Q2 - This command will Dump all 64 registers to the serial buffer
- R - Read/display the time, day and date


